The design development phase turns a signed-off scheme into a fixed design, with its size, systems, materials and cost settled. Picture the Monday after the client approves the schematic plans, with the structural engineer already asking for a grid by Friday.
From that point the questions change. Nobody asks which layout any more. The team asks how this layout stands up, where the ducts run and what the walls are made of. The guide to schematic design covers how you reach the signed-off scheme, and this post starts there.
Key takeaways
- Design development fixes the building's size and character, its structure and services, its main materials and an updated cost.
- Start only after the owner approves the schematic design in writing. RIBA says a project should not enter Stage 3 while spatial requirements or room adjacencies are inconclusive.
- The set holds plans, sections, elevations, typical details, diagrammatic systems layouts and an outline specification.
- Handle client changes through a change control procedure, and keep new options out of the phase.
- Two US public owners each give design development 20% of the architect's fee.
What the design development phase is
Design development is the second phase of the architect's basic services, after schematic design. The team fixes size, layout, structure, services and main materials, and updates the cost. The owner then approves one design before detailed documentation begins.
The AIA's summary of its B101 owner-architect agreement lists the phases in order: "schematic design, design development, construction documents, procurement, and construction". Design development sits between the approved scheme and the set a contractor builds from.
The entry gate is written into the contract. The standard AIA design development clause, as reproduced on Law Insider, opens: "Based on the Owner's approval of the Schematic Design Documents, and on the Owner's authorization of any adjustments in the Project requirements and the budget for the Cost of the Work, the Architect shall prepare Design Development Documents for the Owner's approval."
So two things come first. One is a recorded approval of the schematic set. The other is a recorded owner decision on any change to the requirements or the budget. Without both, the phase starts on a moving brief.
In the UK, the matching stage is RIBA Stage 3, Spatial Coordination. The RIBA Plan of Work 2020 Overview states: "The purpose of Stage 3 is to spatially coordinate the design before the focus turns to preparing the detailed information required for manufacturing and constructing the building."
RIBA sets a gate of its own: "The project should not proceed to Stage 3 if any Spatial Requirements or room adjacencies remain inconclusive." That gate is spatial, while the AIA gate is about approval and budget. Use both on every job. A scheme can be approved on paper and still have a plant room nobody has sized.
What changes after schematic design
After schematic design, the work moves from choosing a layout to making one layout buildable. The scale of decisions shrinks from the whole building to the wall, the riser and the door. The table sets out the shift as most studios run it.
| Question | Schematic design | Design development |
|---|---|---|
| Main question | Which layout and massing suit the brief | How the chosen layout is built and serviced |
| Decisions | Options, massing and room relationships | Grid, wall build-ups, openings and systems routes |
| Drawings | Option plans, massing views and diagrams | Dimensioned plans, sections, elevations and typical details |
| Consultants | Early advice on structure and services | Structural and services layouts drawn onto the base plans |
| Cost | An early estimate from floor areas | An updated estimate against the outline specification |
| Approval | Owner picks and signs off one scheme | Owner approves the set before documentation starts |
A concept that keeps moving is a common failure. The Plan of Work overview says: "It is commonplace for the concept design to continue to be iterated during Stage 3. This diverts the design team from undertaking the core tasks for the stage." The concept "should remain substantially unaltered" in Stage 3.
Read that as a fee warning as well as a design one. Every week spent on new options comes out of the time paid for coordination. When the client wants a different scheme, treat it as a change and run it through step 7 below.
What the design development drawings must show
The set must fix the building in enough detail for each discipline to document it next. The same design development clause names the documents. The architect prepares "drawings and other documents including plans, sections, elevations, typical construction details, and diagrammatic layouts of building systems to fix and describe the size and character of the Project as to architectural, structural, mechanical and electrical systems, and other appropriate elements."
The same clause adds "outline specifications that identify major materials and systems and establish, in general, their quality levels." The agreement also has the architect update the cost estimate. In a working studio, that comes to this list:
- Floor plans for every level, dimensioned, with rooms named and numbered
- Building sections through the stairs, the cores and any change in level
- Elevations of every face, with the main materials named
- Typical construction details for walls, floors, roof and openings
- Diagrammatic layouts of the structure and the mechanical and electrical systems
- An outline specification of the major materials and systems
- An updated cost estimate
Some public owners spell out the plans in more detail. The Pasco County Schools 2026 architect and engineer guidelines ask for "1/8-inch scale floor plan(s) labeled with Room Name, Room Number, and dimensions." Walls and tags get the same treatment: "Label wall partitions, door and window tags, interior and exterior elevation tags, enlarged plan tags, etc."
Pasco's list goes on to "Show plumbing fixtures with confirmed fixture counts and toilet partition layouts" and "Show major furniture, equipment, and casework layouts." That list binds only Pasco's own projects. Even so, it makes a sound floor for any design development plan, because each item is one a consultant or cost planner will ask about.
Room names, numbers and areas are the first of those items to settle. In Synaps, a click inside a closed wall loop makes a room. The room gets an auto-numbered label and a live area that re-measures when the walls move.
RIBA asks for more than drawings at Stage 3. The Plan of Work overview says "Design Studies should be aligned to Cost Exercises and the development of the Outline Specification". In the same stage, "The Project Strategies need to be updated and additional detail added, and a Building Regulations review undertaken."
How to run design development in a studio
Run the phase as a fixed sequence, with the owner's approval at each end. These eight steps suit a studio of a few people working on an everyday building, from a house to a mixed-use block.
1. Confirm the sign-off in writing
Record the owner's approval of the schematic set and any change to the brief or budget. Test the scheme against both gates set out above, and list anything still open. File the signed note or email with the project, where the whole team can find it.
2. Fix the grid and the wall build-ups
Agree the structural grid with the engineer first, because walls, cores and openings hang from it. Then set each wall type layer by layer, using standard wall thicknesses as a starting point. In Synaps you build each wall type in layers, up to eight, adding each layer on the left or right of the wall.
3. Coordinate the consultants
Issue base plans to the structural and services engineers early, then draw their layouts back onto your plans. Expect small moves, such as a core shifting. The RIBA overview gives this case: "a core might have to be rearranged to suit the final toilet and riser layouts." Agree a fixed weekly date for each consultant's return, and keep one current set of base plans.

4. Settle rooms, doors and windows
Fix each room's name, number and area against the brief. Then size every opening: clear width, height and, for windows, sill height. These sizes feed the door and window schedules in the next phase, so settle them now. In Synaps you set Width and Height in each opening's Geometry controls, and Sill for a window.
5. Dimension the plans
Put chained strings on the grid, the openings and the overall sizes, so consultants read sizes instead of scaling them. The guide to floor plan dimensions covers which strings a plan needs. In Synaps you place chained dimension strings with D, end to end along a wall.
6. Update the outline specification and the cost
Name the major materials and systems, and give each one a quality level the cost planner can price. The Washington State fee guidelines ask designers to weigh more than first cost: "Consideration shall be given to availability of materials, equipment and labor, construction sequencing and scheduling, economic analysis of construction and operations, user safety and maintenance requirements, and energy conservation."
Price the specification against the plans each time the plans change, not once at the end. A late cost check that fails sends the team back into redesign with no fee left for it.
7. Run change control
The RIBA overview is direct: "During Stage 3, Change Control Procedures should be used to manage functional changes to the Project Brief and the Architectural Concept." Log each client request with a number and a date. Describe its effect on the drawings, the consultants, the cost and the programme.
Get the client's written approval before anyone redraws. A change the client will not sign stays out of the set.
8. Review the set and get sign-off
Run an internal review against the checklist below, then issue the set with a cover note listing open items. Put a title block with a revision letter and date on every sheet. In Synaps, set each paper's ISO size and scale, then export one combined PDF for the client or DXF for a consultant.
Design development checklist before construction documents
Before construction documents start, the set should answer every question the documentation team would otherwise send back. Go through this list with the project lead before the owner sees the set.
- The structural grid is agreed with the engineer and dimensioned on every plan.
- Every wall type has a named build-up and a total thickness.
- Cores, stairs and risers sit where the structure and services need them.
- Every room has a name, a number and an area that matches the brief.
- Every door and window has a width and a height, and every window a sill.
- Sections cut through every stair, every core and every change in level.
- Elevations show every face, with materials named.
- Typical details cover the main wall, floor, roof and opening conditions.
- Structural, mechanical and electrical layouts sit on the current plans, not an older issue.
- The outline specification gives each major material and system a quality level.
- The cost estimate is priced against this set, not the schematic one.
- Every change since schematic sign-off is logged and approved by the client.
- On UK jobs, the Building Regulations review is recorded.
- Open items are few and listed, each with a name and a date against it.
Anything still open goes into the cover note with a person responsible. Documentation can start with open items, as long as the whole team can see them.
How much of the fee design development takes
Two US public schedules put a number on it. The Washington State Office of Financial Management fee guidelines give it 20% of the basic services fee. The Pasco County Schools 2026 guidelines set "Design Development 20% of total fee". Washington counts against the basic services fee and Pasco against the total fee, so the bases differ.
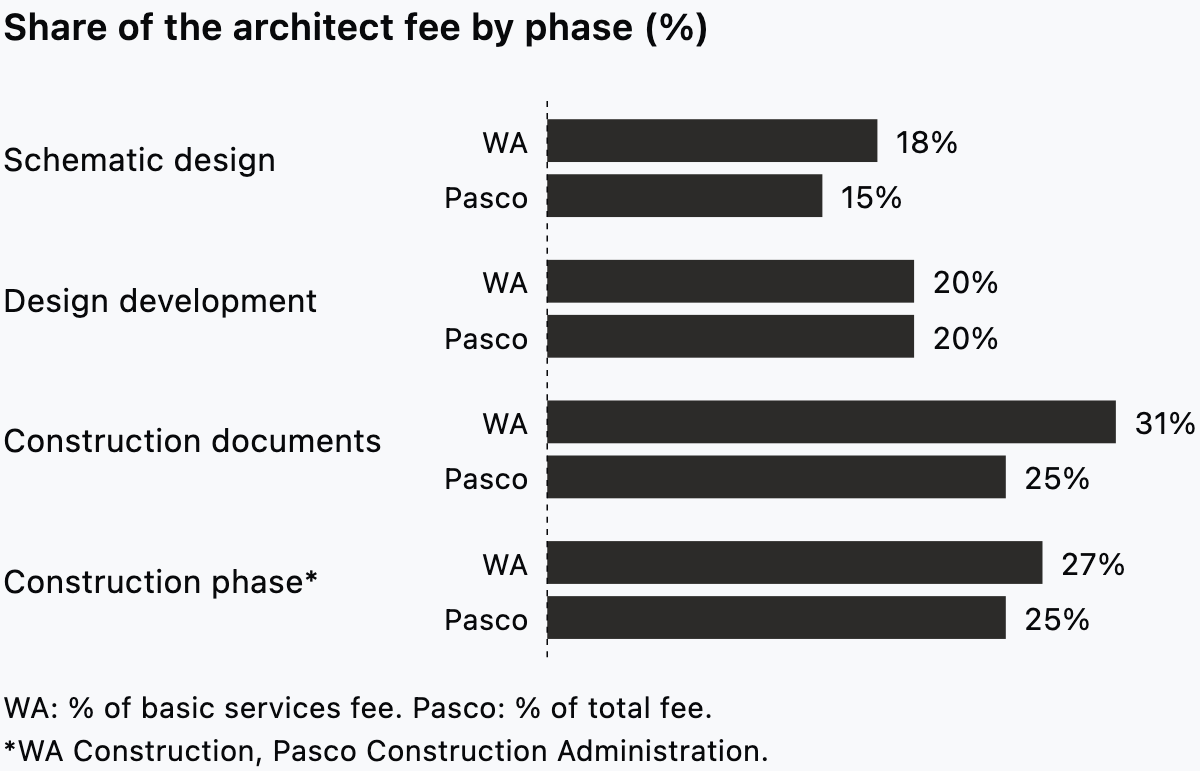
The two schedules split the other phases differently. Washington adds bidding and project closeout at 2% each. Pasco adds project verification, bidding and close out at 5% each. The Washington guidelines say the schedule is "not intended to be absolute". Treat it as a reference point, and Pasco's as binding only on its own projects.
Use these schedules as a check on your own fee proposal. Say design development on your last job used far more than a fifth of the fee you earned. Then look for option work that slipped past the schematic sign-off.
Where Synaps fits
We make Synaps, the drafting software behind this blog. In design development, you use it to draft the floor plans of the set. Wall changes keep coming in this phase, and in flat linework each one means redrafting line by line. In Synaps you move the wall, and its rooms reshape and re-measure.
- Draw the walls with a typed length and angle, then build each wall type in layers.
- Click inside each closed wall loop to make a room with a numbered label and a live area.
- Place doors and windows on the walls, choose their direction, and set width, height and sill.
- Add chained dimensions with D, text with T and leader callouts with Shift+D.
- Create a paper at an ISO size from A0 to A6 and a scale such as 1:50.
- Export the paper as a combined PDF for the client, or DXF for a consultant who needs the geometry.
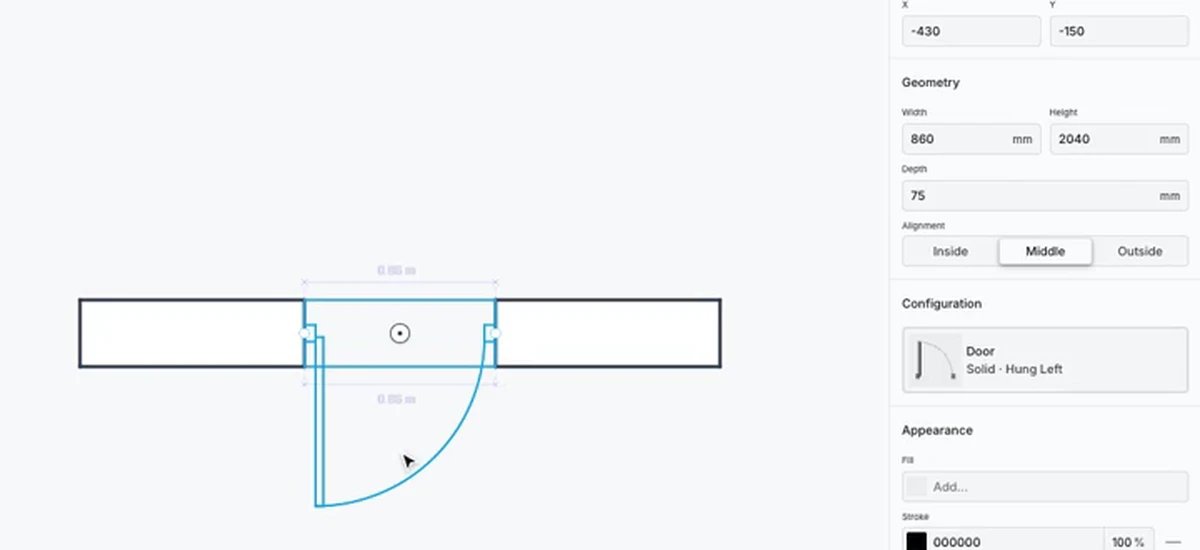
Sections, elevations, details, schedules and specifications come from the other tools in your studio. Dimensions in Synaps are placed, not generated, and do not follow walls you move later.
When your next scheme is signed off, draw its design development plans in Synaps.
Frequently asked questions
Can a contractor price from design development drawings?
Not for a robust tender. The Plan of Work overview says of the Stage 3 information that "while this information is coordinated, it is unlikely to contain sufficient detail to allow robust tenders to be prepared". Use the set for a cost plan or early talks with a contractor, and tender from the next phase's information.
Can construction documents start before design development is finished?
Often, though the stage guidance treats it as a misapplication. The RIBA overview says "It is common to start Stage 4 before the design is Spatially Coordinated". A typical case is engineering design running "one step behind the architect's information." If a programme forces an early start, list every sheet that still waits on a consultant, and plan to reissue those sheets.
When does a UK project submit its planning application?
The Plan of Work places it at the end of Stage 3. The overview says "once the client has signed off a Stage Report that captures all the design development work undertaken during the stage, a Planning Application can be submitted." For an earlier application, "it is important to set a mid-stage gateway". Either way, plan the client sign-off around the planning date.