

A door swing on a floor plan is the open leaf plus the arc its leading edge sweeps around the hinge. Picture a site visit where the plan hinges door D07 on the left and the schedule calls it RH.
The joiner followed the schedule, so the light switch now sits behind the open leaf. Both documents can be right if each uses a different convention. They simply read the door from different sides, and nobody wrote down which.
This guide is for the person who draws the swing and writes the schedule. For windows, stairs and the rest of the legend, see the guide to floor plan symbols.
Key takeaways
- A door swing on plan is the leaf drawn open and the arc its leading edge traces. The hinge sits at the centre of the arc.
- Handing names depend on the viewing side. Allegion's US handing guides read the door from the outside or corridor side, so write your convention on the door schedule.
- Swing direction is a design decision. Test it against egress, clearances, furniture, switches and the other doors nearby.
- Egress rules can fix the direction for you, and the occupant threshold differs between the US and England.
- The Hand column in the schedule must agree with the arc on the plan, door by door.
The door swing symbol on a floor plan
The door swing symbol shows three things: where the door hinges, which way it opens and how much floor the leaf sweeps. Read it from the arc. The point the arc turns around is the hinge, and the arc's far end is the latch side jamb.
Draw the leaf at the angle the door really opens, then the arc back to the closed position. The cut wall stays heaviest, then the frame and leaf, then the arc. A door that folds back 180 degrees needs its arc drawn that far, or the plan hides a clash.
The leaf width on plan is the leaf, not the clear opening. The stop and the open leaf both take width out of the opening, so check the clear opening as well as the leaf. In a deep wall, the frame position also changes where the leaf stops. The guide to standard wall thickness gives typical depths to start from.
Door handing: LH, RH, LHR and RHR
Door handing names the hinge side and the swing direction, read from one stated side of the door. In Allegion's US handing guides that side is the outside. The Schlage door handing guide from Allegion says the hand "is determined by the direction of door swing when viewed from the outside, or corridor side of the door."
The Handing 101 post on I Dig Hardware, written by an Allegion specialist, gives the method. Stand on the secure side, which the post calls the outside or key side, and face the door. Away from you gives a left hand or right hand door, and towards you adds "reverse".
| Hand | Hinges seen from outside | Door swings | Plain description |
|---|---|---|---|
| LH | Left | Away from you | Left hand door, opens in from the corridor |
| RH | Right | Away from you | Right hand door, opens in from the corridor |
| LHR | Left | Towards you | Left hand reverse, opens out to the corridor |
| RHR | Right | Towards you | Right hand reverse, opens out to the corridor |
These four labels match Allegion's door handing quick reference sheet.

UK and European practice can name the same door differently. Two Allegion authors write in a post on international handing that "In British and EN Standards, the handing is followed differently." BS EN handing names the door by its closing direction, written with the numerals 5 and 6. DIN handing is read from the pull side.
So a bare "LH" on a plan can describe two different doors. Write the convention on the door schedule and in the legend, for example "Handing to US convention, read from the corridor side".
Pairs, double-acting, pocket and sliding doors
For a pair, the schedule names the active leaf, the one that opens first. The Handing 101 post notes that "Most pairs are either right hand active (RHA) or right hand reverse active (RHRA) because of traffic flow." Panic hardware will always be LHR or RHR, "because doors with panic hardware are always outswinging."
A double-acting door swings both ways, so draw an arc on each side of the wall. Pocket and sliding doors have no arc. Draw the leaf and its travel instead, dashed where the leaf runs into the wall, and note which way it slides.
How to choose the door swing direction
Choose the swing in this order: egress first, then clearances, then furniture and switches, then the other doors around it. This is a drawing guide, not a code check. Confirm each rule against the adopted code, with the local authority and the project's code consultant.
Egress comes first
In the US, IBC 2021 section 1010.1.2.1 says side-hinged, pivoted and balanced doors "shall swing in the direction of egress travel where serving a room or area containing an occupant load of 50 or more persons or a Group H occupancy." Below that load, outside Group H, this section does not set the direction.
Door type is a separate rule. IBC 2021 section 1010.1.2 requires egress doors to be side-hinged swinging, pivoted or balanced. Exceptions include some areas with an occupant load of 10 or less. The IBC is a model code, so check the edition and amendments each project's state or city has adopted.
In England, Approved Document B Volume 2, paragraph 5.11 says an escape door "should be hung to open in the direction of escape whenever reasonably practicable." The same paragraph says it should always open that way if more than 60 people might use it during a fire. Very high fire risk triggers the same rule.
So the thresholds differ: 50 or more occupants under the IBC, more than 60 people under Approved Document B. Volume 2 of Approved Document B covers buildings other than dwellings in England.
Door swing clearance on the push and pull sides
The swing decides which side of the door needs the most floor. ADA 2010 Table 404.2.4.1 sets manoeuvring clearances for each side of a swinging door. At a front approach, the pull side needs the deeper zone, as the chart shows.
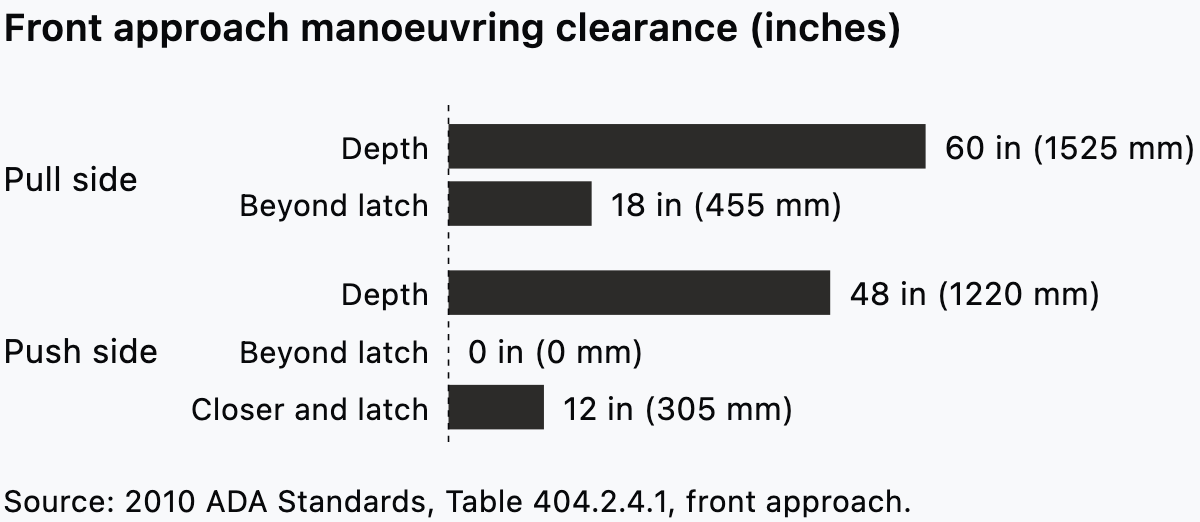
So a door that swings into a tight room puts the deeper pull-side zone inside that room. Swing it out and the deep zone moves to the corridor, where it may fit more easily. The 2010 Standards cover new and altered public accommodations, commercial facilities and State and local government facilities.
Clear width is measured with the door open. ADA section 404.2.3 asks for 32 inches (815 mm) minimum, between the door face and the stop at 90 degrees. IBC 2021 section 1010.1.1 sets the same 32 inches but converts it to 813 mm. The two metric figures differ by rounding, not by rule.
In England, Approved Document M Volume 2 Table 2 sets 800 mm straight-on, measured as effective clear width to any hinge-side obstruction. At internal doors, paragraph 3.10 c of the same volume asks for "an unobstructed space of at least 300mm on the pull side of the door between the leading edge of the door and any return wall". Power-controlled doors and doors to standard hotel bedrooms are excepted. Volume 2 covers buildings other than dwellings in England.
As a rule of thumb, hatch the pull-side clear zone lightly on early plans, so the layout respects it from the start. In Synaps, Measure Distance reads a gap without adding to the drawing, and a dimension placed with D keeps it on the sheet.
Furniture, fixtures and switches
Draw the furniture before you fix the swing. A leaf that opens onto a bed end, a wardrobe front or a WC pan gets stopped short, and the room loses clear width. The guide to space planning covers laying out furniture first.
WC doors need extra care. Approved Document M Volume 2 says doors to WC cubicles and wheelchair-accessible unisex toilets should preferably open out. If they open in, "the door swing should not encroach into the wheelchair turning space or minimum activity space."
Put the light switch on the latch side, outside the arc. A switch on the hinge side ends up behind the open leaf. People then reach past the door into a dark room to find it.
Door-to-door clashes, corridors and landings
Draw every arc on the same plan and look where they meet. Two doors facing across a corridor can open into each other, and a door near a corner can block the next one.
Corridors have their own limit. IBC 2021 section 1005.7.1 says doors, when fully opened, "shall not reduce the required width by more than 7 inches (178 mm)." In any position, the same section bars a door from reducing the required width by more than half.
In England, Approved Document B paragraph 5.13 says any door opening towards a corridor or a stair "should be recessed to prevent its swing encroaching on the effective width." Draw the recess in the wall, not just the arc. Under paragraph 5.12, an escape route door should not reduce the effective width of any escape route across a landing.
Doors in series need a gap. ADA section 404.2.6 sets 48 inches (1220 mm) minimum between them, plus the width of any door swinging into the space.
Quick decision table
Each row pairs a situation with the swing it calls for and the code section behind it.
| Situation | Swing | Figure | Code section |
|---|---|---|---|
| Room with 50 or more occupants, or Group H (US) | With egress travel | 50 occupants | IBC 2021 1010.1.2.1 |
| Escape door used by more than 60 people, or very high fire risk (England) | In the direction of escape | More than 60 people | Approved Document B Vol 2, 5.11 |
| Door opening into a corridor (US) | Either way below 50 occupants, within the limit | 7 in (178 mm) open, half the width in any position | IBC 2021 1005.7.1 |
| Door opening towards a corridor or stair (England) | Recessed so the swing stays clear | No encroachment on effective width | Approved Document B Vol 2, 5.13 |
| Clear opening (US) | Measured at 90 degrees open | 32 in (813 mm IBC, 815 mm ADA) | IBC 2021 1010.1.1 and ADA 404.2.3 |
| Clear opening (England) | Effective clear width to any hinge-side obstruction | 800 mm straight-on, 825 mm off a 1200 mm route | Approved Document M Vol 2, Table 2 |
| Accessible door, front approach (US) | Plan the pull side first | 60 in pull, 48 in push depth | ADA 2010 Table 404.2.4.1 |
| Accessible internal door, pull side (England) | Keep the leading edge clear | 300 mm to any return wall | Approved Document M Vol 2, 3.10 c |
| Two doors in series (US) | Each leaf swinging in adds to the gap | 48 in (1220 mm) plus each leaf | ADA 2010 404.2.6 |
| Accessible WC (England) | Preferably out | Inswing clear of turning and activity space | Approved Document M Vol 2, section 5 |
Draw and place the swing in Synaps
Synaps, which publishes this blog, is an AI-native architecture CAD/BIM workspace in the browser. Here you use it to draw door swings on the plan, then check them yourself against the walls and doors around them. You choose the swing as you place the door, from a preview.
- Find Door in the toolbar, or search for it with Cmd/Ctrl+K.
- Click the wall that will host the door to set its position.
- Move the pointer to choose the door's direction, and watch the arc in the preview.
- Click again to place the door. Its symbol appears in the wall at that position.
- Inspect the wall cut and the symbol, especially near wall ends and junctions.
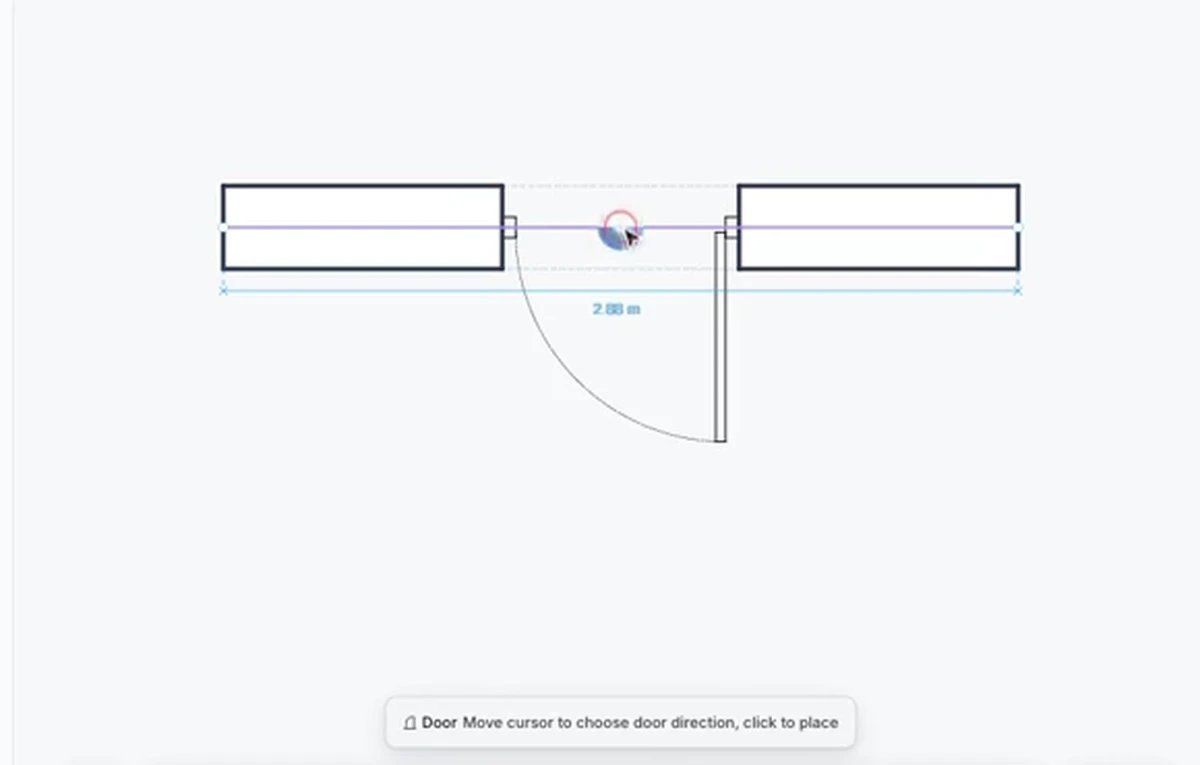
Synaps sets the direction. The Hand label and the schedule are yours to write. To change a placed door's swing, undo with Cmd/Ctrl+Z and place the door again.
Record handing in the door schedule
A door schedule gives each door tag one row: where the door is, its leaf size, its hand and what the hardware supplier needs. The tag on the plan points to that row. The Hand column must describe the same door the arc shows, read from the side the legend names.
In Synaps, set each door's Width and Height in its Geometry controls, then carry those sizes into the schedule. The example below uses the US convention, read from the corridor side, with example leaf sizes in millimetres.
| Tag | From and to | Leaf W x H (mm) | Hand | Swing and notes |
|---|---|---|---|---|
| D01 | Corridor to office 1 | 926 x 2040 | LH | Into office, hinges on the left seen from the corridor |
| D02 | Corridor to office 2 | 926 x 2040 | RH | Into office, mirror of D01, hinges on the right |
| D03 | Training room to corridor | 2 x 826 x 2040 | RHRA | Pair opens out with egress, active leaf on the right, recessed |
| D04 | Corridor to accessible WC | 1026 x 2040 | LHR | Opens out to the corridor, recessed, arc clear of the turning space |
| D05 | Corridor to store | 826 x 2040 | RH | Into store, switch on the latch side outside the arc |
| D06 | Office 1 to office 2 | 926 x 2040 | LH | Into office 2, office 1 taken as outside and stated in the legend |
Check the Hand column against the plan, door by door. Stand in the corridor in your head and find the hinge at the centre of the arc. Then see whether the leaf swings away from you or towards you. Away gives LH or RH, and towards gives a reverse hand.
Doors between two rooms need a call on which room counts as outside, as D06 shows. Write it into the notes, or the joiner will make it for you. Mirrored flats need their own rows, because a mirrored layout flips every hand.
Check door swings before you issue
- Every arc is drawn at the angle the door actually opens.
- No arc crosses another arc, a stair landing, a fixed fitting or a required clear space.
- Egress doors swing with egress travel wherever the code requires it.
- Doors opening into a corridor stay within the projection limit for the project's code.
- Each accessible door keeps its pull-side clear space beside the leading edge.
- Every light switch sits on the latch side, outside the arc.
- The Hand column agrees with the arc on every door, mirrored units included.
- Each tag on the plan matches exactly one schedule row.
- The legend and the schedule both name the handing convention.
- Every pair names its active leaf.
Put the clearances you checked on the plan as dimensions, so the contractor reads them instead of scaling. The guide to floor plan dimensions covers which strings a plan needs.
In Synaps, export the paper as PDF for the schedule review, or as DXF for a consultant who needs the geometry. Open the exported file in the application your recipient will use, and check the door symbols there.
When your next plan reaches the door schedule, draw and check its door swings in Synaps.
Door swing questions
How do I tell a door's hand from its lever handle?
Look at the outer end of the lever. The Schlage handing guide says that, when properly installed, "the end of the lever should point toward the hinge side of the door." Draw the lever that way on elevations too, so the elevation and the plan agree.
Do these swing rules apply to houses and flats?
Only in part. The corridor projection limits in IBC 2021 section 1005.7.1 do not apply inside dwellings. That covers dwelling and sleeping units in Group R-2 and dwelling units in Group R-3.
In England, M4(2) in Approved Document M Volume 1 is an optional requirement that applies only where a planning condition sets it. Where it applies, a principal communal entrance needs a 300 mm leading-edge nib and 1500 mm between door swings in a lobby.
What clear height does a US egress door need?
IBC 2021 section 1010.1.1 sets a minimum clear opening height of 80 inches (2032 mm). Height never shows on the plan symbol. Check the clear height under the head against it, not the leaf height.